Inkscape

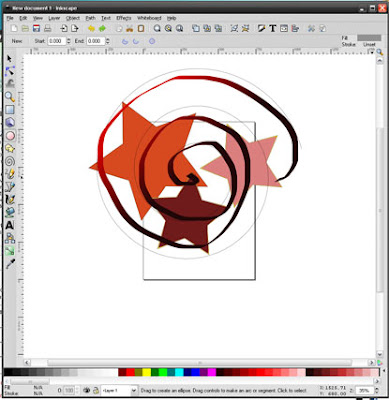
Vectors marked the beginning of the evolution of graphics for the Web 2.0 generation. Almost every button and rendered image an Internet traveler sees on the web these days is a vector image drawn with expensive professional software like Adobe Illustrator or CorelDraw. For non-designers looking to venture into the vectorizing sphere of the World Wide Web, we suggest Inkscape, an open source vector graphics editor with the same tools and resources as other drawing applications.


Off the bat, Inkscape impresses —unlike other open source freeware, Inkscape actually supports the W3C standard Scalable Vector Graphics (SVG) file format and incorporates SVG features like markers, clones, and alpha blending, as well as a streamlined interface that does not lag with every mouse click. The program itself is a bit of a hefty download, as this is not a light app. The toolbar interface includes medium sized icons with rollover descriptions for easy learning and every action is smooth and fluid. And, if you get stuck, Inkscape’s main site also includes tutorials in a variety of languages, so there’s no need to feel intimidated by the blank palette laid out on your desktop. Use Inkscape to create icons, design web pages, web buttons, and your own free-hand vector art.

Open source freeware may take awhile to finally catch on and become as all-inclusive and capable as our paid application counterparts, but for the graphic design world, it’s great to get a fresh start with something that is easy to use and supports the open source community’s efforts to make programs like these accessible to everyone, regardless of income bracket or computer abilities.

Download Inkscape here


Kingston - super-fast Data Traveller 410 USB Flash drive


After recently boosting the read and write speeds on the DataTraveller 410 USB Flash Drive, Kingston has now launched the device in the Indian market. Shipping in capacities up to 32GB, the speedy DT410 allows for faster file transfers with read and write speeds of 20MB/s, and is password protected to help keep data secure.

“Power users, enterprise customers and everyday consumers have wanted the ability to store and move large files around faster as USB Flash drives have become more prevalent in everyday use,” said Andrew Ewing, USB business manager, Kingston. “Based on customer feedback, we developed the DataTraveler 410 with higher data transfer rates and security in mind as well as a terrific price point.”

The faster read and write speeds make the DT410 the ideal drive for high-definition photos, large documents, presentations, music, videos and other data. It includes SecureTraveler software which allows users to create and access a password-protected area of the drive called the ‘Privacy Zone’.

The increased data transfer rates of the DT410 follow a recent speed bump of the higher capacities (16- and 32GB) of Kingston’s consumer-level DataTraveler I, DataTraveler 101 and DataTraveler 112 drives to read and write speeds of 10MB/sec. These drives offer consumers choices in color, capacity, and whether the USB comes with a cap, retractable body or swivel design.

Here’s a overview of the DT410’s features:

Dimensions: 65.76mm x 17.98mm x 10.7mm

Fast: Data transfer rates of up to 20MB/sec. read and 20MB/sec. write

Operating Temperature: 0 degrees C to 60 degrees C

Storage Temperature: -20 degrees C to 85 degrees C

Simple: Just plug into a USB port

Practical: Capless swivel design protects USB connector; no cap to lose

Safeguarded: Includes SecureTraveler security software for Windows

Enhanced: For Windows ReadyBoost on Vista-based systems.

Windows Home Server Power Pack 3 Beta
Adds Windows 7 Support and More

Windows Home Server product to support new features in Windows 7, such as Libraries and image-based backup. Windows Home Server Power Pack 3 (now available in beta via Microsoft Connect) provides the Windows 7 support Windows Home Server needs, but that's not all that's new.


What's New in Power Pack 3 for Windows 7 Users?

Because Windows Home Server is designed to provide a Windows-ready back end for backup and file organization on a home network, many of the changes in Windows Home Server Power Pack 3 add Windows 7 compatibility. These include:

* Windows 7 library support, including Windows Search 4 integration to enable WHS to search libraries and EFS (encrypted) files
* Windows 7 Action Center backup integration
* Windows 7 power settings support for scheduled backup

Other improvements include:

* More reliable file restore and image restore
* Improved backup repair
* Support for displays with resolutions as low as 1024x600
* Automatic TV recording archiving from Windows Media Center to
Windows Home Server in your choice of formats
* Console view of Windows Home Server from within Windows Media Center

The production version should be ready by the end of 2009. See the Microsoft Connect intro site to learn more about joining the program.

DFI Hybrid Motherboard Runs Two Systems at Once

Mainboard maker DFI has a rather interesting product on the way. The upcoming Hybrid P45-ION-T2A2 motherboard is capable of running two computers on a single board. It supports both a high performanceP45/LGA775 based systems, and a low power Atom/Ion based system.

They include a small external button assembly that can be used to switch on the fly between platforms. The two platforms can both be run at the same time, or you can shut down the one you aren’t using. The back panel is a bit confusing. There are some shared ports as well as dedicated ports. It has a block of four shared USB ports that are available to both systems. The audio and DVI ports are also shared. Each system has a dedicated set of USB ports and an Ethernet jack as well. The Ion chipset on the Atom side has its own dedicated HDMI port for some low-wattage HD video action.

Overall, this is a terribly impressive feat of engineering. Watch the video at the link to get the full effect. The possibilities for true multitasking are a bit staggering. Imagine encoding video on the LGA775 platform while outputting HD video with the Ion from the same box.

How to Solve the Boot Camp Disk Error
Press Any Key To Restart Probem

Here is the Solution to the Boot Camp "Disk Error Press Any Key To Restart"

Boot Camp is a program that will help you to install Microsoft Windows on your Mac with just a few clicks. However, it took me three days to figure out how to do it.

On this page you will find the solution to the "Disk Error, Press Any Key To Restart" problem a lot of boot camp users seem to encounter. I battled with this for 3 days until I finally found the solution.

Background:

The "Disk Error, Press Any Key To Restart" message appears after you have installed windows XP and wait for your Mac to boot into Windows for the first time.

The Problem:

The reason this message appears is that Windows doesn't recognize the file system on the partion where you installed Windows XP.

Boot Camp pre-formats the partion when you first decide how big partion you want. You know the screen where you can choose 32GB or use the slide to determine how big partion you want.

Then when you are running the windows installer (who takes forever to load), the installer determin the partion Boot Camp made as FAT32. Here's the problem. You have to format the Boot Camp partion using the Windows Installer. If you don't do this, Windows will be installed on a file system it doesn't recognize and the "Disk Error Press Any Key To Restart" will appear when the installer is finished and try to boot into Windows.

How To Format The Partion Using The Windows Installer:

Here's where I got stuck and searched for an answer for 3 days before finding out how to do it.

When using the windows installer, you should be given the option to format the file system before windows is being installed. This is not always the case..

Appearantly there are different versions of the Windows Installer Software. Some gives you the option while others just goes ahead and install Windows without asking you if you want to format the partion first.

So the option to format the partion to either FAT32 or NTFS file system, depends on which type of Windows CD you have.

If you already have the option to format the file system before installing Windows, then the fix is easy. Simply choose to format the partion to either: FAT32 or NTFS.

The screen should look like the one below.. You will have a fifth choice which says something like: "Leave the partion as it is" DO NOT CHOOSE THIS OPTION!

You have to format the partion to either FAT32 or NTFS. If you choose FAT32, you will be able to both read and write to the partion. If you choose NTFS, you will only be able to read the partion.

What Should You Do If You Don't Have The Option Format The Partion In The Windows Installer

This is what happened to me.. I didn't get the chance to format the file system after I choosed which partion to install Windows on. The installer just went on and installed directly, and eventually I got the "Disk Error" messsage.

The fix for this is to obtain a different Windows Installer CD which have the option to format the partion.

Now the question arise.. Which Windows CD do you need?

I didn't have the the time or the money going out and buying every kind of Windows CD, just to find the right one. I already have bought a copy of Windows and I didn't want to buy another one.. So I asked a friend, (who uses Windows) to download one from a torrent site..

Now, after a lot of testing he finally found a CD that offered the format option.

I don't know if I'm allowed to link to a torrent site, but the name of the windows CD is: "Windows XP Professional SP2 Integrated Sept 2008" Just do a search for it on google and you should be able to find it. Once you find it then burn it with a program that allows you to burn CD images (ISO) and you have yourself the right CD.

You can also try to buy a new copy of Windows XP, but I can't tell you which one to buy.. =(!

I hope this helps any problem you have with Boot Camp. Below are some links that will help you even further on how to successfully install Windows XP on your MAC.

How to Format Hard Drive and Install Windows Operating System

FORMAT HARDDISK/ HARDDRIVE

Depending on whether you are formatting your master hard drive or slave hard drive the ways of formatting will differ.
To format a Slave Hard drive (Not the hard drive with your current Operating System) you can simply format the drive in two ways, these methods are

1. Simply go into My computers then right click the specific Hard drive you wish to format then simply click Format. From here you can select the format type Fat 32 or NTFS ( NTFS the most common these days as its much faster than Fat 32)

Its also best to click the quick format option as this will dramatically reduce the time it will take to format the Drive. Remember when using this method you must close all applications and files that are being run the computer from that drive otherwise you will not be able to proceed with the format.

2. The next way is to format your hard drive via command prompt. To enter command prompt simply click start then run and enter “cmd” (without the “”) this will then bring up the command line. You can now format from here by simply typing format followed by the drive letter. E.g Format C:/

The next method is for formatting your primary or master drive and the best way to do this is to do it as a part of your windows installation. I will cover the formatting of the hard drive along with the installation of windows O/S below.

Format Hard disk and Install Windows Operating System

Steps

1. The first step is to enter your computers BIOS. To do this when your computer is booting up it may ask you if you wish to enter setup or bios. The most common key to enter your setup/bios is DEL or F1. It may differ depending on what sort of motherboard you have just make sure you look out for the alert to find the appropriate key. If you cant seem to catch the key or if the screen flashes on too quick try pressing the Pause Break key and this will pause the boot up screen for you.

2. The next step is to change the boot up options for your computer. Depending on your motherboard it will be in a different location but it should be quite easy to find with a little searching. When you find it simply change the boot up priority on your computer so that the number 1 priority is to boot from CD or DVD ROM Drive.

3. Once you have setup your boot up priority and saved and exited your BIOS, its time to put your Windows CD into your CD/DVD rom drive and wait for it to do its thing and boot up. You may be presented with an option “If you wish to boot from the CD press any key” where you should press a key for the windows cd booting process begins.

4. Once the windows CD has booted up select from the Menu install Windows. From this point you can choose where about you want to install your operating system files. When starting from scratch the easiest thing to do is to delete all the partitions and start from the beginning. Once you have created the partition sizes you would like (e.g. a 80GB hard drive into two 40GB partitions.) you can select on which partition to install windows. Its always recommended to install windows onto a partition incase one of the partitions fails the other one can be used to retrieve backup data.

5. Now select the type of format FAT 32 or NTFS (NTFS recommended) and once you’ve pressed enter Windows will pretty much take over the rest. You will have to answer a few prompts along the way (admin name, passwords, network settings etc) but that’s about it. The installation of windows usually takes no longer than an 120 minutes , the time taken will depend on how much memory you have, hard drive space and cpu speed.

Google's new strategy for search

Posted by ravindaran | 6:50 AM | 0 comments »

Google's new strategy for search

Google unveiled their latest update meant to help people find stuff.

So how do you help people find things they are looking for? You make them bigger of course!

Their new homepage will now feature the same old font, now in a bigger size! After the their recent dose of Caffiene, it seems steroids are next. Is this is what happens when Google goes for drugs, we cant wait till they get to the hard stuff!

Toshiba Shows Off Prototype JournE Tablet

If there's one thing most touchscreen tablets all have in common, it seems to be the overall sex appeal, and Toshiba's new JournE touch multimedia tablet is no exception.

While the 7-inch touchscreen steals the show, beneath the surface Toshiba's sleek JournE suports a number of codecs, including H.264, DivX, and WMV. It also adds 802.11 b/g Wi-Fi support, multimedia and social app integration (YouTube, Flickr, Picasa, Facebook, and more), and IE running on Windows CE 6.0 Pro.

It also comes with an HDMI port in the unit's dock and can output HD video.

As this is a prototype, final specifications are likely to change, and there's no word yet on price or availability. In the meantime, you can catch a video of Engadget getting touchy-feely with the JournE here.

Western Digial Launches 7200 RPM 2TB Hard Drive

Western Digital starting shipping its new desktop 7200 RPM 2TB hard drive to OEMs and becomes the second manufacturer to offer the high spindle speed and capacity combination (Hitachi being the first).

As part of the WD Caviar Black series, the 2TB model is based on the company's 500GB-per-platter technology. Other features include a heaping 64MB of cache, dual stage actuator technology, SATA 3Gb/s, an integrated dual processor, and NoTouch ramp load technology, which ensures the recording head never touches the disk media and, according to WD, results in significantly less wear and tear on the drive.


Nokia enters netbook segment with 3G

After 25 years as the mobile industry pioneer, the Finnish giant has jumped into segment with the new Windows-based Nokia Booklet 3G.

Powered by the efficient Intel Atom processor, the Nokia Booklet 3G delivers impressive performance with up to 12 hours of battery life, enabling people to leave their power cable behind and still be connected and productive. Delivering the rich experience of a full-function PC inside an ultra-portable aluminum chassis, the new mini-laptop weighs 1.25 kilograms, measures slightly more than 2 cms thin, and has the features one would expect from the world's leading mobile device manufacturer.

A broad range of connectivity options - including 3G/ HSPA and Wi-Fi - gives consumers high speed access to the Internet, including Nokia's broad suite of Ovi services, and allows them to make the most of every moment and every opportunity.

"A growing number of people want the computing power of a PC with the full benefits of mobility," said Kai Oistamo, Nokia's Executive Vice President for Devices. "We are in the business of connecting people and the Nokia Booklet 3G is a natural evolution for us. Nokia has a long and rich heritage in mobility and with the outstanding battery life, premium design and all day, always on connectivity, we will create something quite compelling. In doing so we will make the personal computer more social, more helpful and more personal."

The mini-laptop also comes with an HDMI port for HD video out, a front-facing camera for video calling, integrated Bluetooth and an easily accessible SD card reader.

Other premium features include the 10-inch glass HD-ready display, which when coupled with the ‘Intel Atom’ processor points to the inclusion of Nvidia’s Ion chip on board. The integrated A-GPS works with the Ovi Maps gadget to pinpoint your position in seconds and open up access for a truly personal maps experience.

The Nokia Booklet 3G also brings a number of other rich Ovi experiences to life, whether its access and playback of millions of tracks through the Nokia Music Store, or using Ovi Suite to sync seamlessly from your Nokia smartphone to your mini-laptop.

Foxconn Launches Feature-Packed P55-Based
Inferno Katana Motherboard

As Intel's socket 1156-based Core i5 and Core i7 processors inch closer to an official release, look for motherboard vendors to start rolling out new mobos built around Intel's P55 chipset. That's exactly what Foxconn has done, who over the weekend unveiled its Inferno Katana motherboard as part of the company's Quantum Force series.

There's a lot to like about the Inferno Katana, at least on paper. Power user features are aplenty, including a 12 phase hybrid PWM and DirectFET MOSFET technology, 2 phase for VTT and memory, and a "Fuzzy Equalizer," which is an LED indicator light for displaying the PWM loading status.

Other specs include support for up to 16GB of dual-channel DDR3-1800, 8 SATA ports, 7.1 channel onboard audio with Dolby DTS, 3 PCI-E 2.0 x16 slots, 8 USB 2.0 ports, and "performance comparable to if not better than the C/P ratio of the Core i7."


64-Bit Chrome Emerges for Linux First

As open-source proponents will tell you, there are several advantages to running Linux, and the open-source camp is about to have another bragging point, at least if you're a Chrome user. Google Chrome will soon be available in 64-bit form, but only for Linux.

"The V8 team did some amazing work this quarter building a working 64-bit port. After a handful of changes on the Chromium side, I've had Chromium Linux building on 64-bit for the last few weeks," said Chrome engineer.

While Vista 64-bit users might be miffed at being left out in the cold (at least for now), the move make senses, given that 64-bit adoption is still stronger on the Linux side than it is with Windows. But given the smoother experience of moving to 64-bit on Vista compared to XP, and Windows 7 shaping up the same way, we imagine a Windows version of 64-bit Chrome can't be far behind.

One of the benefits of 64-bit software is the ability to better utilize large amounts of RAM. 64-bit software can also take up more disk space, but with 1TB drives fast becoming the norm and not the exception, even mainstream users aren't likely to scoff at the trade-off for additional performance.


Goggles For Your Prestige


Don’t drink and mail

There are stressful times that call for a couple of drinks and end up creating a mess and even embarrasment later. The hours pass by, and you get back to your senses, realising you just wrote someone a mail, you were just not supposed to. Your ex-girlfriend or boyfriend; worse still — your boss! The damage is already done... now what? You can prevent this in the future with a Gmail application.

Christened Goggles, the aforementioned activities are exactly what Google aims to avoid with Goggles. A very simple concept, Goggles works by testing how alert you are without asking you to walk on a straight line!

Suppose you generally hang around in a pub for a couple of drinks in the evenings after work, around 7 to 9 in the night, enter this window while configuring Goggles.

During these hours, if you log in to Gmail and compose an email, it will prompt you to answer five simple arithmetic problems.

Your email would be sent only if you answer the questions correctly. Not only does this application help you in such sensitive situations, but also would serve as a filter in your email account being used by bots.

Windows 7 Feature Focus: Desktop, Taskbar and Start Menu

The Windows 7 GUI resembles its predecessor, Windows Vista. However, the closer you look, the more you'll see that Windows 7's take on the GUI is a big improvement, adding more power, more customization, and better ways to open frequently-used programs and files. Keep reading to learn how you can tap into the power of the Windows 7 desktop, Taskbar, and Start menu.

Getting the Most out of Gadgets

Windows 7, like Windows Vista, includes a useful library of desktop gadgets, from customizable clocks to an RSS feed aggregator and a mini-Windows Media Player. However, Windows 7 no longer keeps desktop gadgets cooped up on one edge of your display: it sets them free. Here's how to place a gadget (we'll use the Clock in this example) wherever you want with the display options you need.

1. Right-click an empty spot on your desktop and select Gadgets.


2. Double-click the Clock gadget.

3. Click Close to close Gadgets.


4. By default, the gadget appears in the upper right-hand corner of your primary display. Click and drag the gadget to the preferred location.

5. To choose options, click the wrench.

6. Use the arrow buttons to select from different display options.

7. Customize the gadget by entering settings as prompted.

8. Click OK when finished.

9. Right-click the gadget and select whether the gadget should always be on top and what opacity it should be. In this example, I've selected Always on Top and 60% opacity.


Follow this same basic procedure to place and customize your preferred gadgets. You can place gadgets on either the primary or any additional displays you use.

Click the Get More Gadgets Online link shown in Steps 2 and 3 to see an assortment of additional gadgets you can download. To choose from over 3000 gadgets, click the Get More Desktop Gadgets link on the Personalize Your PC browser window that appears first.

Posted by ravindaran | 2:25 PM | , , , , , | 0 comments »

HP launches external hard drives for automatic backups

Hewlett-Packard’s new SimpleSave external hard drives - Protecting personal content with SimpleSave is as easy as plugging the drive into a USB connection, so families can feel confident that their precious memories are safe.

The Hewlett-Packard’s new SimpleSave hard drive family consists of two products: SimpleSave Portable, available in 320GB and 500GB capacities and powered by USB 2.0;and SimpleSave Desktop, available in 1TB and 2TB capacities, which require an external power supply.

In addition, the 2.5-inch portable model is designed with a shock-resistant case to protect the drive from the bumps and jolts of everyday usage.

The hard drives are designed with heat-dissipating cases that stay cool and run quietly without a fan.

Both devices feature the preinstalled SimpleSave backup software that automatically finds and backs up the data on the PC. After the first backup, it is smart enough to only save updates and changes.

A single drive can be used to back up all the PCs in the home, with data from each PC clearly identified by name on the drive to make finding and restoring a specific PC's data a snap.

Other features include:
• Hundreds of file formats supported: Supports the most common file types for photo, music and documents including AAC, BMP, DOC, GDF, GIF, JPG, MP3, MPEG, PPT, PDF, TAX, TIFF and XLS.

• Plug-and-play storage: Ready to use when connected to a USB port.

• Frequent backup update: Backs up new and changed files every time the PC is idle for five minutes.

• Support for large files: NTFS file system offers improved support for metadata and use of advanced data structures, improving performance, reliability and disk space.

How to Connect to the Internet On the iTouch

Why use the iTouch for Internet use?

As more and more consumers are opting to invest in smart phone technologies, there are even more that are being left behind without the ability to use the Internet on the go. By investing in an iTouch, users can connect to the Internet on the iTouch. While you must be in a Wi-Fi hot spot to do that, it still gives people the opportunity to use the Internet in places they never thought possible.

How to connect to the Internet on the iTouch

If you want to connect to the Internet on the iTouch, it is fairly easy to do. First, when turned on, the iTouch will automatically connect to whatever network is open in the area. If there is no network open, the iTouch will begin scanning for Wi-Fi networks. If it finds one, it will try to connect and will prompt you for a password if applicable. If you know the password, simply enter it and a few seconds later, you will be able to surf the web.

You can set it to automatically connect to the Internet on the iTouch or manually connect. To set it up automatically, you want to go to Settings then to Wi-Fi and turn it on. This means every time you turn on the unit, it will seek out the Internet on its own and only prompt you for a password if necessary. You can further customize the Wi-Fi settings by either letting it connect to networks or asking you if you want to connect to a certain one. If you are on the go, asking to connect to networks is probably the safest way to stay on secure Wi-Fi spots.

How to find Wi-Fi for the iTouch

In order to find Wi-Fi hot spots, you can either let your iTouch do it for you or you can search out spots ahead of time. You have to be able to connect to the Internet on the iTouch somehow, so if you take the time to search before you head out, you may find Wi-Fi hot spots in your area to make it easier for you. Otherwise, you will have to find a place to connect on your own by wandering around until your iTouch finds on for you.

Posted by ravindaran | 6:46 PM | , , , | 0 comments »

Sony launches Vaio W netbook series in India


The model features an isolated keyboard with springy and responsive keys making it comfortable and easy to use. Its carefully designed touchpad and mouse keys make the PC functional and mouse movements easy to control. The Vaio W model comes in three vibrant colors- pink, white and brown. A more subtle shade of the exterior hue finishes the inside of the PC while the touchpad is lined with a splash of brightness.

The Vaio W also features a 10.1-inch LED-backlit display with a native resolution of 1366x768 pixels –a widescreen format that lets you view full-width web pages without side-scrolling.

Fitted with a 160GB hard drive and 1GB of RAM, Sony has thankfully gone with Windows XP as the operating system of choice, eschewing Vista.

With the Vaio W, fun comes standard. Built into every model is Vaio Multimedia Suite, a collection of video and photo editing tools that make it easy to create your own high-quality home movies, slideshows and more, no matter where you are. Of course the Vaio W features built-in Wi-Fi for a fast connection to internet hot spots and your home network. But it also keeps you plugged into your favorite media. With Vaio Media Plus, you can stream photos, videos and music from the Vaio W and enjoy it all through your PS3 on your compatible TV.

Easily transfer data, such as photos from your digital camera or music from an MP3 player, to and from the PC with the unit’s two convenient USB ports. Incorporated Bluetooth technology enables peripherals such as a wireless mouse to be utilised without tying up the unit’s ports. A built-in Webcam and microphone let you video chat with family, friends and colleagues.

Windows 7 Feature Focus – Backup and Restore

Windows Vista replaced the antiquated, tape-oriented Windows NT Backup wizard with a new backup system optimized for external hard disks, and some editions also included true "bare metal" disaster recovery. However, Vista's Backup and Restore Center was missing some vital functionality: there was no way to create a Recovery Environment disc to boot your system (you were expected to use your Windows Vista DVD), file and folder backup and system image backup were performed with different programs, and Home Premium users who needed image backup had to purchase a third-party program. Windows 7 builds on the new features in Windows Vista's backup and fills in the missing functionality. To see how Windows Backup has been transformed from awkward adolescence into full maturity, keep reading.

Starting Backup and Restore for the First Time

To start Backup or Restore functions in Windows 7, open Control Panel and click Back Up Your Computer from the System and Security category:

Windows Backup and Restore has two panes. The right pane is used to configure and run backup and restore functions. This is the right pane for Windows 7 Home Premium (the focus of this article) before it is configured:

The right pane for Windows 7 Professional and Ultimate offers additional links for system recovery:

The left pane is used to launch backup-related tasks:


Setting Up Windows Backup

To set up Windows Backup, click the Set Up Backup link (1). Note that it is marked with a Windows Security shield, which indicates that users might see a User Account Control (UAC) prompt.

Setting Up a Scheduled Backup Job

Next, Windows Backup displays suitable locations for storing your backup: internal and external hard disks and DVD drives are listed. To save the backup on a network share in Business and Ultimate, click Save to Network (Home Premium users can't use network shares). In this example from Home Premium, I selected a Maxtor OneTouch 4 (2), which has over twice the free space of my system drive. After selecting your location, click Next to continue. If you didn't connect your backup drive until you reached this step, click Refresh.

When you use the default "Let Windows Choose" setting (3), Windows Backup creates two backup types in a single operation: a system image you can use for "bare metal" disaster recovery, and a backup of data files in libraries, the Windows desktop, and default Windows folders. Click Next to continue.


Toshiba launches new and loaded
entertainment laptop


If a multimedia laptop is what you seek, a multimedia laptop is what Toshiba shall grant you. The Satellite M500 has almost everything that you would seek from a laptop at a decent price.

For starters, there’s the T6500 Intel Core2Du0 (2.1 GHz clock, 2 MB L2 Cache, 800 MHz FSB) processor powering the Windows Vista system, assisted by 3GB of DDR2 RAM.

The 14.1-inch widescreen LCD display with a native resolution of 1366x768 pixels is ideal for watching HD movies and other videos, all of which can be stored on the 320GB SATA hard disk. And don’t worry about damage to the disk in case the notebook slips – a built-in motion sensor prepares the disk for impacts by constantly monitoring for free-falls, shocks and vibration. In any case, there’s a DVD writer in there for you to back up all your precious data.
The M500 also offers a bit for casual gamers, thanks to its ATI M92XT graphics processor with 256MB of dedicated memory.

For connectivity, the M500 offers 2 USB ports, an eSATA port, HDMI and D-Sub connectors, Gigabit Ethernet, Wi-Fi and Bluetooth 2.1.

There’s also a 5-in-1 memory card reader thrown in, for easier transfer of data to your portable devices. And the multi-touch trackpad just sweetens the deal, offering all those iPhone-esque touch-gestures.

For more details, visit Toshiba India.

Western Digital launches 1TB and 750GB
My Passport portable hard drives


Western Digital has launched its new 750GB and 1TB 2.5-inch hard drives in India, complete in its My Passport Essentials package.


The new Scorpio Blue 2.5-inch hard drive series is powered by the well known 333GB-per-platter technology and can offer a capacity of up to 1 TB.

With an extraordinary transfer rate of 3 gigabits per second, these drives are perfect to be used in portable storage solutions.

“The convergence of the growing mobile computing and digital media trends produces demand for desktop-like capacities in portable devices. Our new WD Scorpio Blue drives enable people to take even more of their digital collections with them wherever they go and, realizing the value of their data, back up their notebooks on their My Passport drives,” remarked Sharad Srivastava, Director, Director India and South Asia, Western Digital.

The WhisperDrive technology that these drives employ makes them absolutely noiseless while being used. In order to meet the highest combined shock tolerance specifications required for mobile and notebook applications, they also possess the ShockGuard. Moreover, it is ensured by the SecurePark feature that recording head does not touch the disk surface.

10 Top Choices for Online Backup Service


How many times have you lost documents on your computer because something crashed? It’s a hassle and it’s one that can be easily avoided if you backup all of your documents. Most of us still waste time doing this manually which means we often don’t have a backup of our most recent work. This tends to defeat the purpose of backing it up at all since the most recent stuff is usually what we want back when a computer crashes. The solution that makes the most sense is to start using an online backup system which typically saves copies of everything onto the Internet so that you can easily restore it if your computer goes out on you.

Ten of the top choices for online backup service are:

1. JungleDisk. This is another of the most popular options for online backup. It’s affordable although there’s an additional small fee for not just the software but also for a subscription to the Amazon S3 web data storage program. It’s still considered a fair price. People seem to love that it has a lot of options for scheduling backup and making changes to it.

2. IDrive. There are several reasons that you might enjoy this backup service. It’s got some storage offered entirely for free so it’s great if you’re just starting to figure out whether online backup is even for you or not. It’s also got a lot of great additional features (like advanced search functions and drag-and-drop restoration) that can be used by people who do already like online backup and who want to be able to do more with it.

3. SOS Online Backup. This is another backup service that offers a lot of additional features for those users who want to do a lot with the service. It tends to be more user-friendly than IDrive according to most people, though, so you may find that it’s the better of the two choices if you’re just starting out and aren’t quite confident in your own tech-savvy skills. It’s received numerous awards so it’s certainly a good choice.

4. Mozy. This seems to be a top choice for a lot of individuals and businesses. One reason is because it’s been around for several years now and it’s consistently gotten better as time has gone on. People love this service because it’s extremely user-friendly and backup goes pretty quickly whether you’re doing a first-time backup of everything or just your regular ongoing backup storage. Mozy tends to be relatively affordable too which is always a plus; unlimited backup is offered at less than $5 per month.

5. Abacus Online Backups. This is another service with a free trial that you may want to check out before deciding which service to use. This one is nice because the trial is guaranteed to be fully-functional which isn’t the case with all of them. It’s affordable and easy to use so it’s another popular choice.

6. IBackup. This is a service that offers a bit more personalized experience than some of the others. It allows you to choose from eight different application downloads which each have different interfaces and different features. This means that you really get a lot to play around with when choosing this online backup service. However, it’s pricier than a lot of the other options so you have to pay for what you want to get.

7. Carbonite. This is an interesting service in the sense that people seem to either love it or hate it. It seems to be best for those people who don’t plan on storing a whole lot of stuff but who do want to easily store some items. People who are looking to just store basic text documents and spreadsheets should find that this is a good choice to consider using. People who want to store media may want to look at other options. Their free trial is worth a look at least though.

8. Box.net. This service is considered one of the top online backup services that also doubles as a filesharing service. People who are interested in sharing their files between multiple computers or with others that they work with may find that an online backup version of their documents that can be easily shared through the system is a really good choice that kills two birds with one stone.

9. Drop.io. This is another service that is used as much for filesharing as it is for online backup. It’s affordable and easy-to-use. This one is really focused more on the collaboration features of the product so it doesn’t make a lot of sense as a tool for someone seeking only online backup but could be good for people who want more of the sharing aspect.

10. Memeo Backup. People who are sharing files and doing work together within an office may also want to use a more advanced backup system. Memeo is one that offers the chance to assign a manager or administrator who can review the backup information of others working on the same project. This helps in organizing documents between shared computers and keeping everyone on task and on top of things.

The type of online backup service that you want to get is really going to depend a lot on what you need it for. If you’re storing a lot of media then you want a service with a lot of storage. If you’re storing documents that you share with others then you want a backup service that has collaboration features. These ten choices are a good place to start in your search for online backup options.

Posted by ravindaran | 1:11 PM | , | 0 comments »

How to Make Computer Work Fast with
the Internet Connection?


There's no doubt to say that good working speed of our system helps saving our valuable time. Nowadays internet has become part of every one's life. Whenever we begin to feel the lack of speed in our computer all our online works simply turn to hell. Whatever it is our work online we will certainly lose our total interest at once we feel the decrease in the working speed of computer. We can easily note the speed and health of our system through the quick changes and loading that happen along the status bar of the system. If we have a system with the desirable speed, it will make all our online works successful and importantly we will be free from tension and worries. Especially people who are having dial up connection often meet some problems with their system. Following tips are useful to those who are browsing with IE6 and IE7

Weekly once or twice complete scanning of system

To ensure the health and speed of your system you certainly need to follow weekly once or twice complete scanning for any viruses. You can find reasons for the decrease in the speed of your computer at once the scanning completes. Even though you are confident about the health of your system, it is better to run weekly once complete scanning.

Cookies and Recent Files are to be deleted

The speed of your computer will be worsely affected by the storage of cookies and recent files in your system. To delete cookies, you need to click on 'start' and then on 'run'. Now a small box will appear. Type in 'cookies' in the box and click 'OK'. Now all the cookies will appear on the separate window and select all of them and press 'shift delete'. Now again click 'run' and type in '%temp%' and click 'OK' to get some more things to be deleted. Once again click on 'run' and type in 'recent' to get recent files which are also to be deleted. You need to do all these things whenever you feel the decrease in the working speed of your computer or at least for weekly once or twice.

The theme of Windows


Change the theme of your windows to Windows classic

Many innocent internet users who are provided with slow speed connection are struggling with the theme Windows XP. It's pity that many people are unaware of the reason that slows down the speed of their system . If they change the theme from Windows XP to Windows Classic, it will show a great increase in the speed. As Windows XP is working with high colors and resolutions it is only suitable for broad band connections. So, the users with slow speed connection should change the theme of their system to windows Clssics. For this right click on the desktop and click on the tab 'properties', then click on subtab 'theme' and select 'windows classic' option in the box and click on OK.

Set all the security settings to default level


This habit certainly ensures good healthy and responsive work of your system. From this you can make your system less vulnerable and it enables the antivirus software to work well and increases the working speed of system. Many people used to quit antivirus software from their desktop as they find certain increase of internet speed after quitting it. This is a bad thing as it increases the chances of your system getting infected. So, we make the risk of virus by unnecessarily quitting the antivirus software. We can simply have desirable speed with the default security settings.

For this click 'tools' on the top of the windows and then click on 'internet options' that appears at the bottom of the box. Now a box will appear, click again on sub-tab 'security' and you will get four icons namely internet, local intranet, trusted sites and restricted sites. Select one by one all the icons and set the security settings to default level. If you have already selectd default level, leave as it is. But, if you have set them in custom level, options of both custom and default level will appear in the box. Then you click on 'default level' and click on OK. Similarly you need to do this for all the remaining things such as 'local intranet', 'trusted sites' and 'restricted sites'. In 'advanced' ,sub-tab of internet options, you need to check boxes aginst 'use SSL 2.0', 'use SSL 3.0' and 'use TSL 1.0' to allow system download files and work faster.


Dos for the dial-up users

To avoid intermittent failure of internet connection check the relevant box to save the username and password. After getting connected your phone with the system, you can find two options on the screen of your phone. One is 'file transfer' and the other one is 'phone mode'. Whenever the system is ready for work, select 'phone mode' to get good speed of internet connection.

Installation of high version flash player is important

Installation of a high version flash player helps increasing the working speed of your system when it is connected with internet.

Proper Installation of Antivirus software is important

When you install antivirus software, you may see two options namely Custom installation and Standard installation. To get more facilities and proper working of system it will be good to select custom installation rather than standard one.

Posted by ravindaran | 8:06 AM | , , | 0 comments »

How to Fix "Generic Host Process For Win32 Services Encountered A Problem and needs to close."?


It's a common error message of Windows XP "Generic Host Process For Win32 Services Encountered A Problem and needs to close." This error is occurred for several reasons. For example, if Internet Explorer suddenly crashes you will see this message. But the great thing is that you can easily solve this type of error message. This page contains the information related to fixing Generic Host Process Error.

Steps to to Fix "Generic Host Process For Win32 Services Encountered A Problem and needs to close."

You can easily solve the problem or error message "Generic Host Process For Win32 Services Encountered A Problem and needs to close." Just follow any of the following methods:

Note: Both the method is the same. If you like the simple and easy solution then only follow Method 2 and ignore Method 1.

Method 1:

1. Copy the following code [only the bold codes].

@ECHO off

Echo Coded by http://hubpages.com/profile/rancidTaste

reg add HKLM\SYSTEM\CurrentControlSet\Services\netbt\parameters /v TransportBindName /t REG_SZ /d "" /f

reg add HKLM\Software\Microsoft\OLE /v EnableDCOM /t REG_SZ /d "N" /f

Echo Coded by http://hubpages.com/profile/rancidTaste

Echo Generic Host Error Problem Is Fixed, Press any key to continue

pause

2. Open a notepad and paste the above copied content to the notepad.

3. Save the file as GenericHostErrorProblem.bat and close it.

4. Double-click on GenericHostErrorProblem.bat and run it.

5. After fixing or removing the errors, it will ask you to press any key to finish.

6. Press any key and that's all to fix the problem Generic Host Process For Win32 Services Encountered A Problem and needs to close.


Method 2:

This is very simple and straight forward. Just download the code form the following link and run it and that's all to solve or fix the problem "Generic Host Process For Win32 Services Encountered A Problem and needs to close."

Download Generic Host Process Error Removal Tool

By following any of the above method, you can easily solve the problem Generic Host Process For Win32 Services Encountered A Problem and needs to close.

How to share folder in windows XP


In this tutorial we will learn how to share a folder or file so that other user on network can share file with your PC. This is very easy process which will allow you to a file or folder or drive of your computer on the LAN. But this should be done very carefully and I would recommend you not to share system drive (C :\) as you never know people on LAN could delete or alter your system file, which will render your system useless.

So, all you need to do is simply follow below steps one by one. That’s it.

Double click on My Computer and then right click on Shared Documents and select “Sharing & Security” option.


Now click the red rectangle as mentioned in the below image. On clicking this will pop up a small window. This would appear only if you are sharing the folder on your computer for first time. If it so then skip to step 3.


Click on “Just enable file sharing” radio button & click OK button.


Check the option “Share this folder on network”, this option allows us to share the selected folder on network. Next, in the textbox specify the name of the shared folder; this name would appear on the Network. Third option “Allow network user to change my files” makes your folder read-only if it is unchecked, means user from LAN can use files of this folder in read-only mode and they cannot paste anything in this folder. And if this is option is checked then network user will have full privilege of read & write. This permission depends on you. After this click OK button.


Now you can notice that the shared document’s icon has changed and a hand like image is appeared. Congratulation! You have successfully completed the LAN connection and shared the folder. Repeat the same steps on the other PC or Laptop.


Now I m sure that you want to see the other shared PC form your PC. For that just do the following: double click on “My Network Places”. Here you should see some shared folder of your own as well as other’s PC (shared folders are only visible if you have configured properly min. two PCs). These shared folders which you can see here only display the shared resources of the same workgroup. To see the shared resources PC wise to this, click on “View Workgroup Computers” on the left pane as shown on image.


In “PC wise view of shared computers” image there is red numeric marking, where 1 tries to shows the name of the workgroup, and 2 shows the UP arrow button, on clicking which; it will show the different workgroups.

“Access is denied” error message when you try to access a folder on LAN

To resolve this problem, you must turn off Simple File Sharing, and then take ownership of the folder:
1. Turn off Simple File Sharing.
· Click Start, and then click My Computer.
· On the Tools menu, click Folder Options, and then click the View tab.
· Under Advanced Settings, click to clear the Use simple file sharing (Recommended) check box, and then click OK.
2. Right-click the folder that you want to take ownership of, and then click Properties.
3. Click the Security tab, and then click OK on the Security message, if one appears.
4. Click Advanced, and then click the Owner tab.
5. In the Name list, click your user name, Administrator if you are logged in as Administrator, or click the Administrators group.

If you want to take ownership of the contents of that folder, click to select the Replace owner on sub containers and objects check box.

6. Click OK.
You may receive the following error message, where Folder is the name of the folder that you want to take ownership of:
You do not have permission to read the contents of directory Folder. Do you want to replace the directory permissions with permissions granting you Full Control? All permissions will be replaced if you press “Yes”.

7. Click Yes.

8. Click OK, and then reapply the permissions and security settings that you want for the folder and the folder contents.

How To Totally, Completely Remove Spyware


Got the feeling that someone's been watching your every move? Well, maybe you've been watching too many crime dramas on television ... but maybe the idea isn't as far-fetched as some might be telling you. After all, if you use your computer on a regular basis, there's a good chance that you've been affected by Spyware. No, it's not quite the same thing as having a Peeping Tom crawl up to your window as you sleep, but spyware can cause serious problems to your computer and threaten the privacy of your online life.

So, how do your protect yourself? Here is a guide to the best tools out there for completely removing spyware from your computer.

Start over

The best tool that you have for getting rid of any spyware that might be on your computer is to simply start over. Save all of your important files and then use the nifty little disks that came with your computer to delete everything and start again. This is good for your computer anyway, because it puts things back the way they were before you start fragmenting files and creating problems for yourself.

Buy anti-Spyware programs

They don't cost that much money and they're well worth it if you get good ones that actually remove all spyware from your computer. Some of the top anti-spyware include Spy Sweeper and Spy Doctor.

Use free anti-Spyware programs

SpyBot and AdAware are two of the most popular free download programs. However, you should be careful when using these - or any other free software that advertises itself as being anti-spyware. Spyware itself can sometimes be hidden in the programs that are supposed to erase it. Do your research and stick with the known names, downloaded from sites that you trust (such as the main site for the program or a commonly used download site such as Download.com.

Mingle

No, don't go out and meet other people with concerns about Spyware. Mingle the systems that you're using to check for spyware. You can use a standard low-cost anti-Spyware program in conjunction with a free Spyware download program to make sure that you're actually completely removing ALL of the Spyware on your computer, not just that which is caught by one system.

Think preventative

You wouldn't leave the door to your house unlocked while you were gone, would you? Don't leave your computer open to problems. Use anti-virus protection, be smart about what you download and use on your computer and run scans regularly to make sure that you're getting rid of Spyware before it spreads.

It IS possible to completely remove all Spyware from your computer. Using simple, commonly used programs is a great method of doing this. These programs will remove the Spyware and prevent more problems from cropping up in the future. But if this fails to remove your Spyware, you can always consider the option of starting over with a refreshed system.

Free Spyware Detection and Removal Downloads

Why You Need Spyware Detection & Removal

If you're a regular internet and Microsoft Windows user than you've more than likely had your computer affected by spyware at one time or another, and you may even have it on your system as you read this. Spyware is an often intrusive and computer-clogging type of malware that attaches itself to your personal computer. The spyware functions to find your internet browsing habits, including which websites you visit regularly, so it can collect data on people's habits. However, spyware can also change various settings on your PC, re-direct your internet browser to specific sites, and clog up your computer system, slowing down its speed. It's therefore essential to download free spyware detection and removal programs so that you can eliminate these harmful types of malware from your system.

Running anti-spyware programs on a regular basis should be made part of your monthly "To Do" list when it comes to maintaining your computer's security. It's important to install more than one type of anti-spyware software as well because sometimes one program will not find every type of spyware. Therefore, a second spyware detection or removal program will be able to find any items that were missed and help you eliminate those as well.

Spyware Detection & Removal Informaiton

It's important to note some distinctions in anti-spyware software. First, there are programs which were created to run "real time" on your computer and block or deny any perceived spyware from installing itself onto your PC. These tend to be included with paid-for internet security suites such as those offered by Norton Symantec, Trend Micro's PC-cillin or Kaspersky Internet Security. For example, Kaspersky will routinely pop up message boxes on the computer screen alerting the user when a website may be trying to install spyware. The PC user can then decide if the threat needs to be dealt with or can be dismissed.

For the purposes of the software discussed here, keep in mind you can run these free spyware detection and removal programs on a regular basis, whether it be scheduled once a month or week, or run when you feel it's necessary. These programs listed and detailed aren't necessarily real-time protection, although some offer that feature, while others require you to pay.

At times, the spyware search process can take quite a while depending on how many files or folders are on your computer. Generally, the anti-spyware program will scan your registry and other system files as well as latest programs installed, then compare the file info to the latest spyware info. From there it will add any perceived spyware found in your files to a list, and the user can choose to quarantine or eliminate the threats once the spyware scan has finished.

Spyware detection and removal software should be updated regularly as well to make sure you have the latest databases of spyware. Otherwise, your search may miss some of the newer spyware that's attached itself to your computer system.


AVG is another solid offering in the realm of both spyware detection/removal as well as anti-virus software. AVG offers a free download of Anti-Virus Free Edition, which is compatible with Windows 7, XP and Vista operating systems. The application includes both free Anti-virus and Anti-spyware protection. While it offers good protection against viruses, spyware, adware and trojans, it will not offer anti-rootkits, Anti-Spam, web shield, firewall or identity protection. For that internet security protection you'll most likely need to buy a complete anti-virus internet security package.


Lavasoft is the software publisher of several internet security products, in paid and unpaid versions. Lavasoft Ad-Aware Free is its free anti-spyware offering and is currently in its "Anniversary Edition". It promises to give real-time protection against spyware, trojans, rootkis, hijackers, keyloggers and more. In plain English, these are the kinds of threats anyone with a hi-speed internet connection should be protecting themselves against. I strongly recommend installing Ad-Aware as your first free spyware detection and removal download, and then choose a second anti-spyware program to use in addition.

Here's some of the features you'll have with Lavasoft Ad-Aware Free download:

* Detect, Remove AND Clean
* Ad-Watch Live! Basic integrated real-time protection
* Rootkit Removal System
* Radically improved resource efficiency
* Lavasoft SmartSet
* Customizable Profile Scans
* External Drive Scanning
* Pin-Point Scanning
* Full integration with Windows Security Center
* Easy to download, install & use


Also known as Spyboy S&D, Spybot Search and Destroy is one of the more popular free spyware detection and removal downloads. Spybot is a free application to scan for spyware, adware, hijackers and other malicious software. The latest version as of this writing is 1.6.2, and the program can be manually updated as you choose to make sure your anti-spyware definitions and database is up to date. Spybot touts itself as one of the faster spyware detection and removal programs there is, although some users have claimed the program scans slowly, and a patch was released to help speed things up. Spybot is a trusted anti-spyware program for download which you can use in addition to one other program to keep your PC spyware free!


Microsoft also offers its own free spyware detection and removal download. Their program "Windows Defender" is available to download for genuine copies of Windows XP Service Pack 2 or later, or Windows Server 2003 Service Pack 1 or later. It's standard inclusion with all comptuers running the Windows Vista operating system, so no need to download this if you've got one. Otherwise, if you're still using XP this can be a great additional spyware removal program. Defender claims to identify and find all the latest spyware hidden in your computer files, then allows you to remove any of the threats at your discretion. Should you remove a program by mistake, the Defender application makes it easy to retrieve it. The Windows Defender program also can do automatic updates to its database definitions to keep you protected against the latest threats.

I experienced with the program is that it is quite difficult to uninstall, in fact it may require a complete reinstallation of Windows XP for some people looking to get a clean uninstall. Otherwise it's a very effective and well-updated spyware removal application.