How to share folder in windows XP
In this tutorial we will learn how to share a folder or file so that other user on network can share file with your PC. This is very easy process which will allow you to a file or folder or drive of your computer on the LAN. But this should be done very carefully and I would recommend you not to share system drive (C :\) as you never know people on LAN could delete or alter your system file, which will render your system useless.
So, all you need to do is simply follow below steps one by one. That’s it.
Double click on My Computer and then right click on Shared Documents and select “Sharing & Security” option.

Now click the red rectangle as mentioned in the below image. On clicking this will pop up a small window. This would appear only if you are sharing the folder on your computer for first time. If it so then skip to step 3.

Click on “Just enable file sharing” radio button & click OK button.

Check the option “Share this folder on network”, this option allows us to share the selected folder on network. Next, in the textbox specify the name of the shared folder; this name would appear on the Network. Third option “Allow network user to change my files” makes your folder read-only if it is unchecked, means user from LAN can use files of this folder in read-only mode and they cannot paste anything in this folder. And if this is option is checked then network user will have full privilege of read & write. This permission depends on you. After this click OK button.

Now you can notice that the shared document’s icon has changed and a hand like image is appeared. Congratulation! You have successfully completed the LAN connection and shared the folder. Repeat the same steps on the other PC or Laptop.

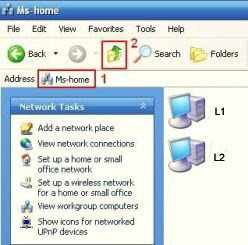
Now I m sure that you want to see the other shared PC form your PC. For that just do the following: double click on “My Network Places”. Here you should see some shared folder of your own as well as other’s PC (shared folders are only visible if you have configured properly min. two PCs). These shared folders which you can see here only display the shared resources of the same workgroup. To see the shared resources PC wise to this, click on “View Workgroup Computers” on the left pane as shown on image.


In “PC wise view of shared computers” image there is red numeric marking, where 1 tries to shows the name of the workgroup, and 2 shows the UP arrow button, on clicking which; it will show the different workgroups.
“Access is denied” error message when you try to access a folder on LAN
To resolve this problem, you must turn off Simple File Sharing, and then take ownership of the folder:
1. Turn off Simple File Sharing.
· Click Start, and then click My Computer.
· On the Tools menu, click Folder Options, and then click the View tab.
· Under Advanced Settings, click to clear the Use simple file sharing (Recommended) check box, and then click OK.
2. Right-click the folder that you want to take ownership of, and then click Properties.
3. Click the Security tab, and then click OK on the Security message, if one appears.
4. Click Advanced, and then click the Owner tab.
5. In the Name list, click your user name, Administrator if you are logged in as Administrator, or click the Administrators group.
If you want to take ownership of the contents of that folder, click to select the Replace owner on sub containers and objects check box.
6. Click OK.
You may receive the following error message, where Folder is the name of the folder that you want to take ownership of:
You do not have permission to read the contents of directory Folder. Do you want to replace the directory permissions with permissions granting you Full Control? All permissions will be replaced if you press “Yes”.
7. Click Yes.
8. Click OK, and then reapply the permissions and security settings that you want for the folder and the folder contents.

0 comments
Post a Comment