Showing posts with label pctabletforu. Show all posts


Inkscape

Vectors marked the beginning of the evolution of graphics for the Web 2.0 generation. Almost every button and rendered image an Internet traveler sees on the web these days is a vector image drawn with expensive professional software like Adobe Illustrator or CorelDraw. For non-designers looking to venture into the vectorizing sphere of the World Wide Web, we suggest Inkscape, an open source vector graphics editor with the same tools and resources as other drawing applications.


Off the bat, Inkscape impresses —unlike other open source freeware, Inkscape actually supports the W3C standard Scalable Vector Graphics (SVG) file format and incorporates SVG features like markers, clones, and alpha blending, as well as a streamlined interface that does not lag with every mouse click. The program itself is a bit of a hefty download, as this is not a light app. The toolbar interface includes medium sized icons with rollover descriptions for easy learning and every action is smooth and fluid. And, if you get stuck, Inkscape’s main site also includes tutorials in a variety of languages, so there’s no need to feel intimidated by the blank palette laid out on your desktop. Use Inkscape to create icons, design web pages, web buttons, and your own free-hand vector art.

Open source freeware may take awhile to finally catch on and become as all-inclusive and capable as our paid application counterparts, but for the graphic design world, it’s great to get a fresh start with something that is easy to use and supports the open source community’s efforts to make programs like these accessible to everyone, regardless of income bracket or computer abilities.

Download Inkscape here


Kingston - super-fast Data Traveller 410 USB Flash drive


After recently boosting the read and write speeds on the DataTraveller 410 USB Flash Drive, Kingston has now launched the device in the Indian market. Shipping in capacities up to 32GB, the speedy DT410 allows for faster file transfers with read and write speeds of 20MB/s, and is password protected to help keep data secure.

“Power users, enterprise customers and everyday consumers have wanted the ability to store and move large files around faster as USB Flash drives have become more prevalent in everyday use,” said Andrew Ewing, USB business manager, Kingston. “Based on customer feedback, we developed the DataTraveler 410 with higher data transfer rates and security in mind as well as a terrific price point.”

The faster read and write speeds make the DT410 the ideal drive for high-definition photos, large documents, presentations, music, videos and other data. It includes SecureTraveler software which allows users to create and access a password-protected area of the drive called the ‘Privacy Zone’.

The increased data transfer rates of the DT410 follow a recent speed bump of the higher capacities (16- and 32GB) of Kingston’s consumer-level DataTraveler I, DataTraveler 101 and DataTraveler 112 drives to read and write speeds of 10MB/sec. These drives offer consumers choices in color, capacity, and whether the USB comes with a cap, retractable body or swivel design.

Here’s a overview of the DT410’s features:

Dimensions: 65.76mm x 17.98mm x 10.7mm

Fast: Data transfer rates of up to 20MB/sec. read and 20MB/sec. write

Operating Temperature: 0 degrees C to 60 degrees C

Storage Temperature: -20 degrees C to 85 degrees C

Simple: Just plug into a USB port

Practical: Capless swivel design protects USB connector; no cap to lose

Safeguarded: Includes SecureTraveler security software for Windows

Enhanced: For Windows ReadyBoost on Vista-based systems.

Windows Home Server Power Pack 3 Beta
Adds Windows 7 Support and More

Windows Home Server product to support new features in Windows 7, such as Libraries and image-based backup. Windows Home Server Power Pack 3 (now available in beta via Microsoft Connect) provides the Windows 7 support Windows Home Server needs, but that's not all that's new.


What's New in Power Pack 3 for Windows 7 Users?

Because Windows Home Server is designed to provide a Windows-ready back end for backup and file organization on a home network, many of the changes in Windows Home Server Power Pack 3 add Windows 7 compatibility. These include:

* Windows 7 library support, including Windows Search 4 integration to enable WHS to search libraries and EFS (encrypted) files
* Windows 7 Action Center backup integration
* Windows 7 power settings support for scheduled backup

Other improvements include:

* More reliable file restore and image restore
* Improved backup repair
* Support for displays with resolutions as low as 1024x600
* Automatic TV recording archiving from Windows Media Center to
Windows Home Server in your choice of formats
* Console view of Windows Home Server from within Windows Media Center

The production version should be ready by the end of 2009. See the Microsoft Connect intro site to learn more about joining the program.

DFI Hybrid Motherboard Runs Two Systems at Once

Mainboard maker DFI has a rather interesting product on the way. The upcoming Hybrid P45-ION-T2A2 motherboard is capable of running two computers on a single board. It supports both a high performanceP45/LGA775 based systems, and a low power Atom/Ion based system.

They include a small external button assembly that can be used to switch on the fly between platforms. The two platforms can both be run at the same time, or you can shut down the one you aren’t using. The back panel is a bit confusing. There are some shared ports as well as dedicated ports. It has a block of four shared USB ports that are available to both systems. The audio and DVI ports are also shared. Each system has a dedicated set of USB ports and an Ethernet jack as well. The Ion chipset on the Atom side has its own dedicated HDMI port for some low-wattage HD video action.

Overall, this is a terribly impressive feat of engineering. Watch the video at the link to get the full effect. The possibilities for true multitasking are a bit staggering. Imagine encoding video on the LGA775 platform while outputting HD video with the Ion from the same box.

How to Solve the Boot Camp Disk Error
Press Any Key To Restart Probem

Here is the Solution to the Boot Camp "Disk Error Press Any Key To Restart"

Boot Camp is a program that will help you to install Microsoft Windows on your Mac with just a few clicks. However, it took me three days to figure out how to do it.

On this page you will find the solution to the "Disk Error, Press Any Key To Restart" problem a lot of boot camp users seem to encounter. I battled with this for 3 days until I finally found the solution.

Background:

The "Disk Error, Press Any Key To Restart" message appears after you have installed windows XP and wait for your Mac to boot into Windows for the first time.

The Problem:

The reason this message appears is that Windows doesn't recognize the file system on the partion where you installed Windows XP.

Boot Camp pre-formats the partion when you first decide how big partion you want. You know the screen where you can choose 32GB or use the slide to determine how big partion you want.

Then when you are running the windows installer (who takes forever to load), the installer determin the partion Boot Camp made as FAT32. Here's the problem. You have to format the Boot Camp partion using the Windows Installer. If you don't do this, Windows will be installed on a file system it doesn't recognize and the "Disk Error Press Any Key To Restart" will appear when the installer is finished and try to boot into Windows.

How To Format The Partion Using The Windows Installer:

Here's where I got stuck and searched for an answer for 3 days before finding out how to do it.

When using the windows installer, you should be given the option to format the file system before windows is being installed. This is not always the case..

Appearantly there are different versions of the Windows Installer Software. Some gives you the option while others just goes ahead and install Windows without asking you if you want to format the partion first.

So the option to format the partion to either FAT32 or NTFS file system, depends on which type of Windows CD you have.

If you already have the option to format the file system before installing Windows, then the fix is easy. Simply choose to format the partion to either: FAT32 or NTFS.

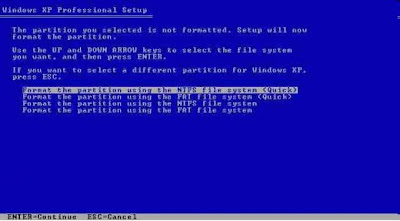
The screen should look like the one below.. You will have a fifth choice which says something like: "Leave the partion as it is" DO NOT CHOOSE THIS OPTION!

You have to format the partion to either FAT32 or NTFS. If you choose FAT32, you will be able to both read and write to the partion. If you choose NTFS, you will only be able to read the partion.

What Should You Do If You Don't Have The Option Format The Partion In The Windows Installer

This is what happened to me.. I didn't get the chance to format the file system after I choosed which partion to install Windows on. The installer just went on and installed directly, and eventually I got the "Disk Error" messsage.

The fix for this is to obtain a different Windows Installer CD which have the option to format the partion.

Now the question arise.. Which Windows CD do you need?

I didn't have the the time or the money going out and buying every kind of Windows CD, just to find the right one. I already have bought a copy of Windows and I didn't want to buy another one.. So I asked a friend, (who uses Windows) to download one from a torrent site..

Now, after a lot of testing he finally found a CD that offered the format option.

I don't know if I'm allowed to link to a torrent site, but the name of the windows CD is: "Windows XP Professional SP2 Integrated Sept 2008" Just do a search for it on google and you should be able to find it. Once you find it then burn it with a program that allows you to burn CD images (ISO) and you have yourself the right CD.

You can also try to buy a new copy of Windows XP, but I can't tell you which one to buy.. =(!

I hope this helps any problem you have with Boot Camp. Below are some links that will help you even further on how to successfully install Windows XP on your MAC.

How to Format Hard Drive and Install Windows Operating System

FORMAT HARDDISK/ HARDDRIVE

Depending on whether you are formatting your master hard drive or slave hard drive the ways of formatting will differ.
To format a Slave Hard drive (Not the hard drive with your current Operating System) you can simply format the drive in two ways, these methods are

1. Simply go into My computers then right click the specific Hard drive you wish to format then simply click Format. From here you can select the format type Fat 32 or NTFS ( NTFS the most common these days as its much faster than Fat 32)

Its also best to click the quick format option as this will dramatically reduce the time it will take to format the Drive. Remember when using this method you must close all applications and files that are being run the computer from that drive otherwise you will not be able to proceed with the format.

2. The next way is to format your hard drive via command prompt. To enter command prompt simply click start then run and enter “cmd” (without the “”) this will then bring up the command line. You can now format from here by simply typing format followed by the drive letter. E.g Format C:/

The next method is for formatting your primary or master drive and the best way to do this is to do it as a part of your windows installation. I will cover the formatting of the hard drive along with the installation of windows O/S below.

Format Hard disk and Install Windows Operating System

Steps

1. The first step is to enter your computers BIOS. To do this when your computer is booting up it may ask you if you wish to enter setup or bios. The most common key to enter your setup/bios is DEL or F1. It may differ depending on what sort of motherboard you have just make sure you look out for the alert to find the appropriate key. If you cant seem to catch the key or if the screen flashes on too quick try pressing the Pause Break key and this will pause the boot up screen for you.

2. The next step is to change the boot up options for your computer. Depending on your motherboard it will be in a different location but it should be quite easy to find with a little searching. When you find it simply change the boot up priority on your computer so that the number 1 priority is to boot from CD or DVD ROM Drive.

3. Once you have setup your boot up priority and saved and exited your BIOS, its time to put your Windows CD into your CD/DVD rom drive and wait for it to do its thing and boot up. You may be presented with an option “If you wish to boot from the CD press any key” where you should press a key for the windows cd booting process begins.

4. Once the windows CD has booted up select from the Menu install Windows. From this point you can choose where about you want to install your operating system files. When starting from scratch the easiest thing to do is to delete all the partitions and start from the beginning. Once you have created the partition sizes you would like (e.g. a 80GB hard drive into two 40GB partitions.) you can select on which partition to install windows. Its always recommended to install windows onto a partition incase one of the partitions fails the other one can be used to retrieve backup data.

5. Now select the type of format FAT 32 or NTFS (NTFS recommended) and once you’ve pressed enter Windows will pretty much take over the rest. You will have to answer a few prompts along the way (admin name, passwords, network settings etc) but that’s about it. The installation of windows usually takes no longer than an 120 minutes , the time taken will depend on how much memory you have, hard drive space and cpu speed.

Toshiba Shows Off Prototype JournE Tablet

If there's one thing most touchscreen tablets all have in common, it seems to be the overall sex appeal, and Toshiba's new JournE touch multimedia tablet is no exception.

While the 7-inch touchscreen steals the show, beneath the surface Toshiba's sleek JournE suports a number of codecs, including H.264, DivX, and WMV. It also adds 802.11 b/g Wi-Fi support, multimedia and social app integration (YouTube, Flickr, Picasa, Facebook, and more), and IE running on Windows CE 6.0 Pro.

It also comes with an HDMI port in the unit's dock and can output HD video.

As this is a prototype, final specifications are likely to change, and there's no word yet on price or availability. In the meantime, you can catch a video of Engadget getting touchy-feely with the JournE here.

Western Digial Launches 7200 RPM 2TB Hard Drive

Western Digital starting shipping its new desktop 7200 RPM 2TB hard drive to OEMs and becomes the second manufacturer to offer the high spindle speed and capacity combination (Hitachi being the first).

As part of the WD Caviar Black series, the 2TB model is based on the company's 500GB-per-platter technology. Other features include a heaping 64MB of cache, dual stage actuator technology, SATA 3Gb/s, an integrated dual processor, and NoTouch ramp load technology, which ensures the recording head never touches the disk media and, according to WD, results in significantly less wear and tear on the drive.


Nokia enters netbook segment with 3G

After 25 years as the mobile industry pioneer, the Finnish giant has jumped into segment with the new Windows-based Nokia Booklet 3G.

Powered by the efficient Intel Atom processor, the Nokia Booklet 3G delivers impressive performance with up to 12 hours of battery life, enabling people to leave their power cable behind and still be connected and productive. Delivering the rich experience of a full-function PC inside an ultra-portable aluminum chassis, the new mini-laptop weighs 1.25 kilograms, measures slightly more than 2 cms thin, and has the features one would expect from the world's leading mobile device manufacturer.

A broad range of connectivity options - including 3G/ HSPA and Wi-Fi - gives consumers high speed access to the Internet, including Nokia's broad suite of Ovi services, and allows them to make the most of every moment and every opportunity.

"A growing number of people want the computing power of a PC with the full benefits of mobility," said Kai Oistamo, Nokia's Executive Vice President for Devices. "We are in the business of connecting people and the Nokia Booklet 3G is a natural evolution for us. Nokia has a long and rich heritage in mobility and with the outstanding battery life, premium design and all day, always on connectivity, we will create something quite compelling. In doing so we will make the personal computer more social, more helpful and more personal."

The mini-laptop also comes with an HDMI port for HD video out, a front-facing camera for video calling, integrated Bluetooth and an easily accessible SD card reader.

Other premium features include the 10-inch glass HD-ready display, which when coupled with the ‘Intel Atom’ processor points to the inclusion of Nvidia’s Ion chip on board. The integrated A-GPS works with the Ovi Maps gadget to pinpoint your position in seconds and open up access for a truly personal maps experience.

The Nokia Booklet 3G also brings a number of other rich Ovi experiences to life, whether its access and playback of millions of tracks through the Nokia Music Store, or using Ovi Suite to sync seamlessly from your Nokia smartphone to your mini-laptop.

Foxconn Launches Feature-Packed P55-Based
Inferno Katana Motherboard

As Intel's socket 1156-based Core i5 and Core i7 processors inch closer to an official release, look for motherboard vendors to start rolling out new mobos built around Intel's P55 chipset. That's exactly what Foxconn has done, who over the weekend unveiled its Inferno Katana motherboard as part of the company's Quantum Force series.

There's a lot to like about the Inferno Katana, at least on paper. Power user features are aplenty, including a 12 phase hybrid PWM and DirectFET MOSFET technology, 2 phase for VTT and memory, and a "Fuzzy Equalizer," which is an LED indicator light for displaying the PWM loading status.

Other specs include support for up to 16GB of dual-channel DDR3-1800, 8 SATA ports, 7.1 channel onboard audio with Dolby DTS, 3 PCI-E 2.0 x16 slots, 8 USB 2.0 ports, and "performance comparable to if not better than the C/P ratio of the Core i7."


64-Bit Chrome Emerges for Linux First

As open-source proponents will tell you, there are several advantages to running Linux, and the open-source camp is about to have another bragging point, at least if you're a Chrome user. Google Chrome will soon be available in 64-bit form, but only for Linux.

"The V8 team did some amazing work this quarter building a working 64-bit port. After a handful of changes on the Chromium side, I've had Chromium Linux building on 64-bit for the last few weeks," said Chrome engineer.

While Vista 64-bit users might be miffed at being left out in the cold (at least for now), the move make senses, given that 64-bit adoption is still stronger on the Linux side than it is with Windows. But given the smoother experience of moving to 64-bit on Vista compared to XP, and Windows 7 shaping up the same way, we imagine a Windows version of 64-bit Chrome can't be far behind.

One of the benefits of 64-bit software is the ability to better utilize large amounts of RAM. 64-bit software can also take up more disk space, but with 1TB drives fast becoming the norm and not the exception, even mainstream users aren't likely to scoff at the trade-off for additional performance.


Goggles For Your Prestige


Don’t drink and mail

There are stressful times that call for a couple of drinks and end up creating a mess and even embarrasment later. The hours pass by, and you get back to your senses, realising you just wrote someone a mail, you were just not supposed to. Your ex-girlfriend or boyfriend; worse still — your boss! The damage is already done... now what? You can prevent this in the future with a Gmail application.

Christened Goggles, the aforementioned activities are exactly what Google aims to avoid with Goggles. A very simple concept, Goggles works by testing how alert you are without asking you to walk on a straight line!

Suppose you generally hang around in a pub for a couple of drinks in the evenings after work, around 7 to 9 in the night, enter this window while configuring Goggles.

During these hours, if you log in to Gmail and compose an email, it will prompt you to answer five simple arithmetic problems.

Your email would be sent only if you answer the questions correctly. Not only does this application help you in such sensitive situations, but also would serve as a filter in your email account being used by bots.

Windows 7 Feature Focus: Desktop, Taskbar and Start Menu

The Windows 7 GUI resembles its predecessor, Windows Vista. However, the closer you look, the more you'll see that Windows 7's take on the GUI is a big improvement, adding more power, more customization, and better ways to open frequently-used programs and files. Keep reading to learn how you can tap into the power of the Windows 7 desktop, Taskbar, and Start menu.

Getting the Most out of Gadgets

Windows 7, like Windows Vista, includes a useful library of desktop gadgets, from customizable clocks to an RSS feed aggregator and a mini-Windows Media Player. However, Windows 7 no longer keeps desktop gadgets cooped up on one edge of your display: it sets them free. Here's how to place a gadget (we'll use the Clock in this example) wherever you want with the display options you need.

1. Right-click an empty spot on your desktop and select Gadgets.


2. Double-click the Clock gadget.

3. Click Close to close Gadgets.


4. By default, the gadget appears in the upper right-hand corner of your primary display. Click and drag the gadget to the preferred location.

5. To choose options, click the wrench.

6. Use the arrow buttons to select from different display options.

7. Customize the gadget by entering settings as prompted.

8. Click OK when finished.

9. Right-click the gadget and select whether the gadget should always be on top and what opacity it should be. In this example, I've selected Always on Top and 60% opacity.


Follow this same basic procedure to place and customize your preferred gadgets. You can place gadgets on either the primary or any additional displays you use.

Click the Get More Gadgets Online link shown in Steps 2 and 3 to see an assortment of additional gadgets you can download. To choose from over 3000 gadgets, click the Get More Desktop Gadgets link on the Personalize Your PC browser window that appears first.